在使用JetBrains CLion调试OpenJDK的过程中,有时候会发现Call Stack中有一部分是汇编代码,导致无法完全探究其内部实现。本文主要针对此问题给出了如何在不引入汇编代码(零汇编,Zero-Assembler)的情况下完成OpenJDK项目的编译和调试。
Java String 面面观
本文主要介绍Java中与字符串相关的一些内容,主要包括String类的实现及其不变性、String相关类(StringBuilder、StringBuffer)的实现 以及 字符串缓存机制的用法与实现。
Java中的遍历(遍历集合或数组的几种方式)
本文主要总结了Java中遍历集合或数组的几种方式,并介绍了各种遍历方式的实现原理,以及一些最佳实践。最后介绍了Java集合类迭代器的快速失败(fail-fast)机制。
MySQL 5.7 编译调试指南(Ubuntu 16.04 + MacOS 10.15)
本文主要介绍在MacOS 10.15和Ubuntu 16.04系统下编译构建MySQL 5.7.30并使用JetBrains CLion(以下简称CLion)进行运行调试的方法。
OpenJDK 编译调试指南(Ubuntu 16.04 + MacOS 10.15)
本篇文章主要介绍在MacOS系统和Ubuntu系统上如何编译OpenJDK项目代码,并使用IDE工具JetBrains CLion(下文简称CLion)来运行/调试OpenJDK。
记一次诡异的JVM退出问题
背景
- 项目基于
Spring Boot,会与另外一个项目通过HTTP协议进行RPC通信,所以项目中启动了Netty作为HTTP Server。 - 项目使用
Maven构建,使用appassembler-maven-plugin插件进行打包,使用打包后的脚本启动。
问题现象
某次更改代码,本地测试通过,没有问题。
部署测试环境,发现服务刚启动就会退出,重启还是退出,但是日志中没有找到任何任何报错异常信息。
问题复现
开始在本地复现:
- 使用IDEA启动主类运行程序,没有问题,一切正常。
- 会不会是
appassembler插件生成的启动脚本的问题?根据测试环境的配置打包,使用启动脚本运行程序,这次问题复现了。 - 在另外一台电脑上使用启动脚本运行程序,没有问题,一切正常。
问题并不能百分之百复现,与运行环境有着微妙的关系。
问题原因
我们从头来思考下这个问题,我们能看到的现象是JAVA应用退出了,也就是JVM关闭了,那么导致JVM关闭的原因有那些呢?
- 调用Runtim.exit方法或者Runtime.halt方法,并且 SecurityManager允许执行退出操作。
- 所有的非守护线程结束,线程结束原因有两种:
- run()方法正常返回
- 线程中抛出了未捕获的异常
JVM退出原因翻译至JDK文档,原文如下:
When a Java Virtual Machine starts up, there is usually a single non-daemon thread (which typically calls the method named main of some designated class). The Java Virtual Machine continues to execute threads until either of the following occurs:
- The exit method of class Runtime has been called and the security manager has permitted the exit operation to take place.
- All threads that are not daemon threads have died, either by returning from the call to the run method or by throwing an exception that propagates beyond the run method.
项目是一个Web Server应用,代码中没有主动调用exit()方法,所以排除第一种情况,重点考虑的是第二种情况。
不管是项目中LogBack的日志还是JVM的日志,都没有发现异常信息。基本可排除发生了异常。
那就只有可能是程序真的就是没有任何”问题”,所有线程都正常运行结束。
猜想
因为项目并没有用到Spring Boot内嵌的Web容器(Netty Server是在另外一个依赖包中启动的),所以项目启动时指定了web选项为NONE。
1 | public static void main(String[] args) throws InterruptedException { |
因为我们指定了了web选项为NONE,所以SpringBoot不会去启动Tomcat等Web容器,有没有可能是线程启动顺序问题呢,我们需要的Netty Server相关的线程还未启动,main线程以及其他非守护线程都已经结束,所以程序退出了呢?
验证猜想
验证很简单,在主线程执行完毕退出前sleep一段时间:
1 | public static void main(String[] args) throws InterruptedException { |
打包编译运行,发现程序正常,没有退出。
继续验证一下是不是因为所有的非守护线程都已经执行结束导致程序退出。在主线程执行完毕退出前打印出所有线程的信息:
1 | public static void main(String[] args) throws InterruptedException { |
输出:
1 | xxl-job, executor JobLogFileCleanThread,true |
可以看到除了main线程之外的其他线程都是daemon线程,所以在main线程执行完后程序会退出。到这里说明我们起初的猜想是没有问题的。
溯源
那么我们想要的提供HTTP服务的相关线程为什么没有启动呢?我们Sleep 100ms之后再打印一下所有线程信息:
1 | public static void main(String[] args) throws InterruptedException { |
1 | xxl-job, executor JobLogFileCleanThread,true |
可以看到多出来的两个非守护线程是nioEventLoopGroup-x-x,这组线程正是Netty中用来处理HTTP请求的工作线程。为什么这组线程没有来得及创建呢?
我们找到创建它的地方,查看他启动Web Server的过程,看到这样一段代码:
1 |
|
可以看到在这个方法中启动了一个线程来创建Web Server,但是这个线程是daemon的,所以如果NioEventLoopGroup线程还未启动,其他非守护线程(包括main线程)已经执行完的话,那么程序就会退出。
而在我们上面sleep 100ms 的这段时间,给了这组线程启动的机会,所以程序能够继续运行。
至于有时能复现有时复现不了的原因猜测,应该是机器环境或者是JAVA启动参数不同导致线程启动先后顺序有微妙的差异。
总结
- JVM退出的原因:
- 调用Runtim.exit方法或者Runtime.halt方法,并且 SecurityManager允许执行退出操作。
- 所有的非守护线程结束,线程结束原因有两种:要么是run()方法正常返回,要么是线程中抛出了未捕获的异常
参考文档
Java 如何处理未捕获异常
问题
如果代码中发生了异常,但我们没有用try/catch捕获,JVM会如何处理?
这是一段肯定会发生异常的代码,但我们没有处理异常,运行这个代码会发生什么?
1 | public class Main { |
程序结束,并且控制台输出下面的内容:
1 | Exception in thread "main" java.lang.ArithmeticException: / by zero |
这是如何背后的逻辑是什么,为什么会输出这些内容呢?
JAVA异常体系
首先来复习一下JAVA的异常体系。
异常分类
异常继承结构大致如下:
JAVA中所有的异常都是继承自Throwable类。可以分为以下两类:
- 非检查异常(
unchecked exceptions),包括以下两种:- 错误(
Error),包括Error类及其子类。这种异常是在正常情况下,不大可能出现的情况,绝大部分的Error都会导致程序(比如JVM自身)处于非正常的、不可恢复状态。既然是非正常情况,所以不便于也不需要捕获,常见的比如OutOfMemoryError类。 - 运行时异常(
RuntimeException),包括RuntimeException类及其子类。这种异常通常是可以通过编码避免的逻辑错误,具体根据需要来判断是否需要捕获,并不会在编译期强制要求。
- 错误(
- 受检查异常(
checked exception),除了上面两种(Error类及其子类,RuntimeException类及其子类),其他异常都属于受检查异常。这种异常通常是外部错误,不是代码逻辑的错误,编译器强制要求对这种异常进行处理,比如网络连接错误会抛出IOException,我们应该提前预料这种情况并对其进行处理(比如重试)。
异常处理
JAVA中处理异常的方式有两种:
- 使用
try/catch捕获异常并进行处理。 - 使用
throws关键字,在方法上声明可能会抛出的异常,由外层调用者去处理这个异常。
上面两种异常中,受检查异常必须被捕获,否则会编译失败,而非检查异常在编译期不强制要求被捕获。
未捕获异常
如果一个非检查异常没有被捕获处理,那这就是未捕获异常。因为受检查异常都必须在代码中捕获进行处理,所以未捕获异常实际上都是在说非检查异常。
在探究如何处理未捕获异常之前先来看一个接口,这个接口是处理未捕获异常的关键接口:
Thread.UncaughtExceptionHandler接口
1 |
|
这个接口很简单,只有一个方法,用来处理未捕获的异常,参数是线程信息,以及异常信息,
下面从源码层面来看看如何处理未捕获异常。
未捕获异常处理流程
Thread类中有一个dispatchUncaughtException方法,这个方法的作用是分发异常信息到正确的UncaughtExceptionHandler。当线程运行中出现了未捕获的异常,JVM会调用线程的这个方法,来寻找一个UncaughtExceptionHandler处理异常。
1 | /** |
getUncaughtExceptionHandler的获取逻辑是,如果此线程的uncaughtExceptionHandler属性不为null,则分发异常到线程自己的uncaughtExceptionHandler,否则将异常分发给此线程所在的线程组。
1 | /** |
分别来看下两种方式:
线程自己处理
Thread类有一个uncaughtExceptionHandler属性,表示这个线程当这个线程发生未捕获异常时的处理器,可以通过Thread.setUncaughtExceptionHandler方法来设置这个属性。如果没有显式调用此方法设置,那么uncaughtExceptionHandler属性默认为null。
1 | // null unless explicitly set |
交给线程组处理
如果没有设置线程的uncaughtExceptionHandler属性或者为null,则会将异常信息分发给线程所在的线程组。上面代码可以将group作为结果返回是因为所有线程组的父类ThreadGroup类实现了Thread.UncaughtExceptionHandler接口。
如果当前线程的线程组重写了uncaughtException方法,会调用重写的uncaughtException方法,否则调用ThreadGroup类的uncaughtException方法。
下面是这个ThreadGroup类的uncaughtException方法的实现:
1 | /** |
处理流程如下:
- 首先,如果这个线程组有父线程组(
parent属性),将会调用父线程组的uncaughtException方法处理。 - 否则,先调用
Thread.getDefaultUncaughtExceptionHandler()检查是否有一个默认的UncaughtExceptionHandler,如果有,交给这个默认的UncaughtExceptionHandler来处理。 - 否则,如果该异常是
ThreadDeath的实例,那么直接退出,如果不是,会将线程名字以及异常栈打印至标准错误输出流(控制台)。这是我们没有设置任何处理器时的默认逻辑,开头那段代码就是这种情况,没有设置任何处理器,所以只是在控制台输出了线程名称和异常信息。
默认处理器
上面代码中第二个分支中Thread.getDefaultUncaughtExceptionHandler()是什么呢?
1 | // null unless explicitly set |
可以看到这个方法是一个Thread类的静态方法,defaultUncaughtExceptionHandler也是Thread类的静态属性,表示可以供所有线程使用的默认的UncaughtExceptionHandler。可以分别通过setter方法和getter方法设置和获取。
处理流程总览

注:上图中Handler指的是
UncaughtExceptionHandler
扩展知识
ThreadGroup - 线程组
- 线程组是一组线程的集合
- 线程组中也可以包含其他线程组
- 线程组的组织是一个树结构,除了初始线程组之外每个线程组都有父线程组
- 线程组实现了
Thread.UncaughtExceptionHandler接口 - 初始线程组是
system线程组,由系统创建,这个线程组没有父线程组,通过下面这个构造方法创建1
2
3
4
5
6
7
8
9/**
* Creates an empty Thread group that is not in any Thread group.
* This method is used to create the system Thread group.
*/
private ThreadGroup() { // called from C code
this.name = "system";
this.maxPriority = Thread.MAX_PRIORITY;
this.parent = null;
}
ThreadDeath
我们还忽略了一个小细节,就是在ThreadGroup类的默认处理逻辑中,如果异常是ThreadDeath的实例,是不会进行处理的。ThreadDeath的源码:
1 | /** |
当Thread.stop()方法被调用时,会抛出一个ThreadDeath类的实例。
应用程序只有必须在异步终止后进行清理时才应该捕获该类的实例。如果 ThreadDeath 被一个方法捕获,那么将它重新抛出非常重要,因为这样才能让该线程真正终止。
这就是为什么ThreadGroup的uncaughtException没有捕获ThreadDeath异常。
参考链接
JDK源码阅读-Integer
主要属性
- 最基本的是表示包装的基本类型的值:
1
private final int value;
- 与类型相关的常量
1
2
3
4
5
6
7
8
9
10
11// int能表示的最小值
public static final int MIN_VALUE = 0x80000000;
// int能表示的最大值
public static final int MAX_VALUE = 0x7fffffff;
// 代表基本类型int的Class类示例
public static final Class<Integer> TYPE = (Class<Integer>) Class.getPrimitiveClass("int");
//补码形式的比特数
public static final int SIZE = 32;
//补码形式的字节数
public static final int BYTES = SIZE / Byte.SIZE; - 用来辅助而定义的常量
digits常量中存的是所有可以用来表示数字的字符,最大包含36进制。
1 | final static char[] digits = { |
DigitTens和DigitOnes分别用来获取一个两位数的十位字符表示和个位字符表示。
1 | final static char [] DigitTens = { |
上面几个数组主要是用来在转化数字为字符串时通过查表快速获得对应的位。
sizeTable主要用来快速判断一个数的位数。
1 | final static int [] sizeTable = { 9, 99, 999, 9999, 99999, 999999, 9999999, |
IntegerCache类
1 | private static class IntegerCache { |
Integer内部有一个static内部类,使用数组缓存了一部分值对应的的包装对象,这部分值的默认范围是[-128,127],不过缓存大小可以通过-XX:AutoBoxCacheMax=<size>参数来控制,该参数可以设置初始化缓存初始化时high的值,但是low是不变的,固定为-128。
缓存中的值在public static Integer valueOf(int i)方法中使用。
构造方法
1 | public Integer(int value) { |
int->Integer 方法
1 | public static Integer valueOf(int i) { |
首先从判断是否在初始化好的IntegerCache的缓存范围内,如果在直接返回缓存中的值,否则new一个返回。
String->int 方法
以下这些方法主要用来将String类型解析为int基本类型:
1 | //解析指定进制的字符串转化为int基本类型 |
parseInt方法
1 | public static int parseInt(String s, int radix) throws NumberFormatException{ |
主要逻辑:
- 判断字符串不为空,并且传进来进制参数在2和36之间。
- 处理首位符号
+或者-。 - 接下来就是将字符串转化为数字的逻辑。就是我们熟悉的每一位权重乘以权值(也就是进制数)依次相加,如:127转换成十进制
1*10*10+2*10+7*1=127。- 但是这里的处理方式不同之处在于统一按照负数来计算而不是按照正数来计算,这是为了在计算得到结果后可以直接将符号位加在前面得到结果。而如果采用正数来计算,正数的范围是无法表示
Integer.MIN_VALUE的相反数的,这样省去了单独处理Integer.MIN_VALUE的逻辑,非常妙。 - 循环中的两次判断都是为了防止溢出,在相乘或者相减之前提前判断以防止相乘之后溢出导致判断大小出错。
- 但是这里的处理方式不同之处在于统一按照负数来计算而不是按照正数来计算,这是为了在计算得到结果后可以直接将符号位加在前面得到结果。而如果采用正数来计算,正数的范围是无法表示
parseUnsignedInt方法
1 | public static int parseUnsignedInt(String s, int radix) |
这个方法是将字符串按照无符号数来处理
- 如果字符串前有
-,抛出异常。 - 对于确定在不会超过
int最大范围内的数(根据位数判断),调用Integer.parseInt方法处理。 - 有可能超过
int范围的,调用Long.parseLong方法解析为long基本类型,如果解析后的值不超过32位,强制转换为int返回,如果超出了32位,抛出异常。Long.parseLong方法的逻辑与Integer.parseInt方法逻辑一致。
String->Integer 方法
以下这几个方法主要用来将String类型转化为Integer包装类型。
1 | public static Integer valueOf(String s, int radix) throws NumberFormatException { |
这两个方法首先将String类型解析为int基本类型,然后调用valueOf(int i)返回其包装类型。
int->String 方法
toString方法
以下这几个方法主要用来将int基本类型转化为String类型。
1 | // 处理任意进制(2-36),遇到十进制会调用下面一个方法 |
toString(int i, int radix)方法
1 | public static String toString(int i, int radix) { |
- 判断进制,不符合条件按照十进制处理,处理十进制调用
toString(int i)方法,速度更快。 - 接下来的过程我们也很熟悉。初始化一个
char数组,然后就是依次取余,得到其对应的char字符,倒序填充数组,在第一位处理符号位。- 这里同样是统一转化为负数处理来避免
Integer.MIN_MAX转化为正数时溢出 - 用提前初始化好的数组
digits快速获查表得对应的字符
- 这里同样是统一转化为负数处理来避免
toString(int i)方法
1 | public static String toString(int i) { |
这个方法和上一个方法思想是一样的,但是用到几个技巧:
int的高两个字节和低两个自己分开处理,低两个字节一次处理两位,高两个字节一次处理一位。- 取余数时没有用取模运算,而是先做除法,再做乘法。
- 一次处理两位时,先除以100,再乘以100,用原数相减得到余数。乘以100用位运算(
q * 100=((q << 6) + (q << 5) + (q << 2)))代替。 - 一次处理一位时,先除以10,再乘以10,用原数相减得到余数。除以10用乘法和位运算(
i / 10=(i * 52429) >>> (16+3))代替,乘以10用位运算(q * 10=((q << 3) + (q << 1)))代替。
- 一次处理两位时,先除以100,再乘以100,用原数相减得到余数。乘以100用位运算(
以上位运算替换均是为了加快计算速度。
q * 100=((q << 6) + (q << 5) + (q << 2))q * 10=((q << 3) + (q << 1))i / 10=(i * 52429) >>> (16+3)
分别解释一下这三个等式为什么成立:
100 = 2^6 + 2^5 + 2^2->q * 100 = q * (2^6) + q * (2^5) + q * (2^2)->(q << 6) + (q << 5) + (q << 2)10 = 2^3 + 2^1->q * 10 = q * (2^3) + q * (2^1)->(q << 3) + (q << 1)(i * 52429) >>> (16+3)->(i * 52429) / (2^19)->(i * 52429) / (2^19)->(i * 52429) / 524288, 这个结果在不考虑余数的情况下等于i / 10
解释完正确性之后,来思考几个问题:
- 为什么要用这么难理解的位运算的来代替乘除呢?显然是为了运算效率,几种运算的效率差别分别为:位运算 > 乘法 > 除法。所以用处理高位时用位运算代替乘法,处理低位时用位运算和乘法代替除法,用位运算代替乘法。
- 为什么要将高位和低位分开运算呢?答案也是计算速度上的考量,计算高两个字节时可以一次计算两位加快效率,而计算低两个字节时可以通过用乘法和移位代替除法(上面第三个等式)来加快计算效率。
toUnsignedString方法
以下两个方法将将参数中的i作为无符号数转换为String。例如:Integer.toString(Integer.MIN_VALUE) -> -2147483648Integer.toUnsignedString(Integer.MIN_VALUE) -> 2147483648
1 | public static String toUnsignedString(int i, int radix) { |
这两个方法首先都将i当成无符号数然后转换为long型,也就是保留低32位,高32位填0(转换后的long型值一定为正数)。然后调用Long.toString方法或者Long.toUnsignedString方法得到结果。
特殊进制的格式化方法
1 | public static String toOctalString(int i) { |
这几个方法分别是二进制,八进制,十六进制的格式化方法。之所以这这几个进制有单独的方法,是因为他们都是2的幂次,所以可以直接处理其二进制位。例如八进制就是一次处理三位,十六进制就是一次处理四位。
注意这里都是按照无符号数来处理的。
toUnsignedString0()方法就是通用的处理方法。
- 首先计算最后的值的长度,这里并没有考虑符号的问题,统一是按照无符号数来处理的。
((mag + (shift - 1)) / shift)相当于(mag / shift)向上取整。numberOfLeadingZeros计算的是前导0的个数,后面会说。 formatUnsignedInt这个方法比较好理解,就是一次处理shift位,方法是与(1 << shift - 1)相与,然后右移,处理下一个shift位。
有关位运算的一些方法
代码中的一些位运算方法注释中的
HD指的是《Hacker’s Delight》一书,其中有解释了大量位运算相关的技巧,中文译本《算法心得:高效算法的奥秘》
highestOneBit | lowestOneBit
1 | public static int highestOneBit(int i) { |
这两个方法返回都是2的幂(即二进制表示中至多只有一位是1),两个方法分别表示参数i的二进制表示中只保留最高位1和只保留最低位1后的值。
例如:14的二进制表示为1110(省略高位0),highestOneBit(14) = 8,即1000,lowestOneBit(i) = 2,即0010。
如果将参数i看成二进制的话,就是一个返回最高位1的权值,一个返回最低位1的权值。将14表示为2的幂的和:14 = 8 + 4 + 2, highestOneBit可以得到第一个数,lowestOneBit可以得到最后一个数。
但是注意两点:
- 负数的时候,
highestOneBit始终返回-2147483648,因为最高位始终为符号位1。 - 参数为0时,两个方法返回都是
0。
这两个方法有什么实际用途呢?
highestOneBit得到的值等于将参数x下调为小于等于x且与之最接近的2的幂
我们来看一下具体是怎么实现的。highestOneBit的思想是将最高位的1一直向右传播,直到其右方全是1,然后将其右边的0全部‘减掉’。示例:
1 | i 01000000 00000110 11100011 11011100 |
lowestOneBit思想是来自于相反数的补码表示,一个数的相反数的补码表示为原数的补码表示按位取反,再加1,加1之后,最右边的就会进位一直到第一个0也就是原数第一个1的位置。最后相与,因为前面的位都是相反的,所以都为0,而最低位1之后都相等。看个例子就明白了。
1 | 132416 00000000 00000010 00000101 01000000 |
numberOfLeadingZeros | numberOfLeadingZeros(前导0和后导0的个数)
1 | public static int numberOfLeadingZeros(int i) { |
这两个方法是用来计算前导0的个数和后导0的个数。具体实现方式使用了二分的思想。numberOfLeadingZeros方法中,首先判断前16位(i >>> 16)是不是全为0,如果不是则判断前8位,如果是则计数增加16并且左移16位之后再判断前8位(这个时候实际判断的是原数的17-24位),然后依次判断前4位,前2位,前1位。numberOfTrailingZeros方法中,不同的是计数初始值为31,首先判断后16位(i << 16)是不是等于0,如果是则判断最后24位,如果不是则计数减16并且左移16位后判断最后24位(这个时候判断的实际是原数的最后8位),依次判断后28,30,31位。
我们来看下其中的细节:numberOfLeadingZeros为什么最后一步不太一样呢,其实原本的样子应该是这样的:
1 | ...... |
可以将最后一个分支转化为n = n + 1 - (i >>> 31),如果将n初始化为1,加法也可以省去。为了计算效率,真是操碎了心啊。numberOfTrailingZeros最后一步也不太一样,其实原本的样子是这样的:
1 | ...... |
用i >>> 31代替了判断是否为0和加1操作。
bitCount(计算1的位数)
1 | public static int bitCount(int i) { |
bitCount方法用来判断二进制表示中1的个数。
先来说一下其原理,基本的思想是分治法,首先将相邻的两位相加结果存放到一个宽度为2的位段,此时这个两位值表示的就是原先两位中1的个数;然后将相邻两个位段相加结存到一个宽度为4的位段中,此时这个四位值表示是原先四位中1的个数;依次处理8位,16位,最后得到的结果就是原数中1的个数。
可以用下面这张图来解释:
再来说下代码,首先,代码原型是这样:
1 | x = (x & 0x55555555) + ((x >>> 1) & 0x55555555); |
这个代码是如何变成上面的那个四不像代码的呢?其实进行了一些优化:
- 第一步: 这一步有点看起来像黑魔法,将加法操作变为了减法操作。
我们先只看两位操作,原操作相当于x & 0x01 + ((x >>> 1) & 0x01),而这个黑魔法相当于x - (x >>> 1 & 0x01)。
如何证明这两个操作是等同的呢?
假设两个位从左到右分别为b0,b1,也就是原先的值x等于b0 * 2^1 + b1 * 2^0 = 2b0 + b1,而我们最后想要的值其实是b0 + b1,b0 + b1 = (2b0 + b1) - b0,就等于x - (x >>> 1 & 0x01)。32位一起处理就是上面的结果i - ((i >>> 1) & 0x55555555) - 第二步:原样不变,没有优化。
- 第三步:因为求和操作的结果最多为8,不会超过四位,所以可以先相加后位与
- 第四第五步:相加结果不会向相邻位段进位,所以可以先相加后位与,但是因为最多只有32个
1占6位,所以这两步可以的消位操作可以放到最后一起做。
rotateLeft | rotateRight (循环左移和循环右移)
1 | public static int rotateLeft(int i, int distance) { |
这两个方法返回一个int值循环左移和循环右移后的值。distance参数中除了最低的五位外都会被忽略(相当于与0x3f相与),可以认为范围始终在0-32之间,这与java语言规范中<<,>>,>>>指令的语义规范一致。
If the promoted type of the left-hand operand is int, then only the five lowest-order
bits of the right-hand operand are used as the shift distance. It is as if the right-hand
operand were subjected to a bitwise logical AND operator & with the
mask value 0x1f (0b11111). The shift distance actually used is therefore always in
the range 0 to 31, inclusive.
代码很好理解,左移就是左移d位后的值与右移32-d后的值相与,就相当于将左移溢出的部分补全到右边的位置;右移同理。那么代码中的(i >>> -distance)和(i << -distance)是怎么回事呢?其实-distance & 0x1f就等于32 - distance。所以这里可以直接用-distance来做运算。
reverse(比特翻转)
1 | public static int reverse(int i) { |
reverse方法将int型值的二进制补码表示翻转顺序。思想也比较简单,还是分治思想,首先将以1bit为单位翻转顺序然后以2bit为单位翻转顺序,依次进行。
为什么最后一句不太一样,因为到了按照8bit操作时,直接按照byte来操作了。
reverseBytes(字节翻转)
1 | public static int reverseBytes(int i) { |
将int型值的二进制补码表示以byte为单位翻转。
signum (计算符号位)
1 | public static int signum(int i) { |
signum方法用来计算一个int型值的符号,正数返回1,负数返回-1,0返回0。
分别考虑|两边的式子(i >> 31)在i>0时返回0,i<0时返回-1,i=0时返回0(-i >>> 31)在i>0是返回1,i<0时返回0,i=0时返回0
可见,两个式子分别能满足正数和负数的返回值要求,将两者相与便都可以可以覆盖正数和负数。
无符号除法
1 | public static int divideUnsigned(int dividend, int divisor) { |
divideUnsigned 和 remainderUnsigned分别是求两个int数作为无符号数相除得到的商和余。原理是将两个数转换为无符号long型(高32位填0)相除和求余。
获取指定的int型系统变量
TODO…
JDK源码阅读-包装类
概览
JAVA中的基本类型有八种,分别是:byte,short,int,long,float,double,char,boolean。
在JDK中都有对应的包装类,均在java.lang包中,分别是:Byte,Short,Integer,Long,Float,Double,Boolean,Character。
以下源码基于JDK1.8。
这几个类型的继承关系如图: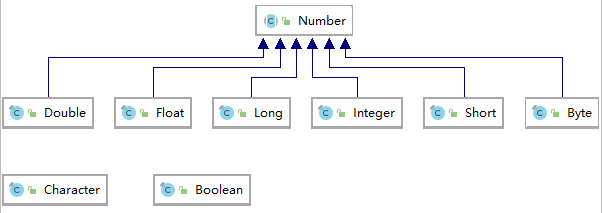
Number
Byte,Short,Integer,Long,Float,Double这几个表示数字的类均继承自Number类。
Number类是一个 abstract类,Numbr类有以下方法:
1 | public abstract int intValue(); |
这几个方法分别对应了每种类型向其他类型转换的方法。byteValue,shortValue这两个方法是直接由intvalue()返回值强制转换过来的。
系列文章:
JDK源码阅读-Integer